
Photography is an art that demands precision, and one of the key components ensuring this precision is a clean camera lens. A clean lens not only enhances image quality but also prolongs the life of your camera equipment. This comprehensive guide will walk you through the steps to clean a camera lens effectively, ensuring that your photography remains sharp and your equipment remains in top condition. Camera lenses are delicate and require careful handling and maintenance. Over time, they can accumulate dust, fingerprints, smudges, and other debris, which can degrade image quality. Regular cleaning is essential, but it’s equally important to do it correctly to avoid damaging the lens. This guide will cover everything you need to know about cleaning your camera lens, from the materials you’ll need to the step-by-step process.
Why It’s Important to Clean Your Camera Lens:
Before diving into the cleaning process, let’s understand why it’s crucial to keep your camera lens clean:
Image Quality:
The clarity and sharpness of your photographs depend heavily on the cleanliness of your lens. Dust particles and smudges on the lens surface can scatter light, causing blurriness and reducing the overall contrast in your images. Smudges can also create unwanted glare and artefacts, which can be particularly noticeable in high-contrast scenes or when shooting against bright light sources. A clean lens ensures that the light entering the camera is unimpeded, resulting in sharper, more vibrant images.
Lens Longevity:
Over time, dust, dirt, and oils from fingerprints can accumulate on your lens. If left unattended, this buildup can become more difficult to remove and may eventually cause scratches or abrasions when you attempt to clean it. Additionally, in humid environments, dirt and moisture can combine to form mold or fungus on the lens elements, potentially causing permanent damage. Regular cleaning helps prevent these issues, ensuring that your lens remains in good condition and functions optimally for years to come.
Professionalism:
As a photographer, the condition of your equipment reflects your level of professionalism and care. Clean lenses demonstrate that you pay attention to the details that affect the quality of your work. Whether you’re a professional photographer or an enthusiast, maintaining clean lenses shows that you take pride in your craft and are committed to producing the best possible results. This attention to detail can enhance your reputation and credibility, whether you’re working with clients or sharing your work with others.
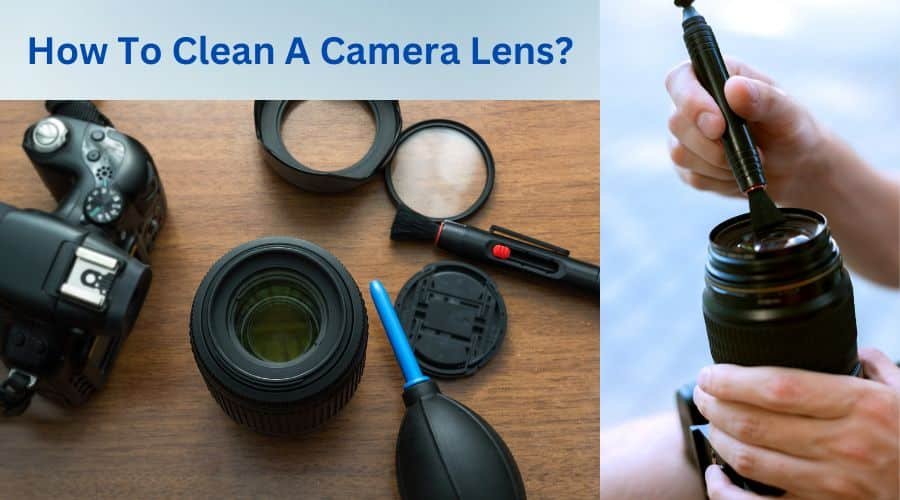
Materials Needed for Cleaning
To clean your camera lens, you’ll need the following materials:
- Blower: A manual air blower is used to remove loose dust and particles.
- Brush: A soft-bristled brush helps remove dust without scratching the lens.
- Microfiber Cloth: Specifically designed for lenses, these cloths are non-abrasive and highly effective.
- Lens Cleaning Solution: A specially formulated solution to remove smudges and fingerprints.
- Lens Cleaning Tissue or Pre-moistened Lens Wipes: Disposable and convenient for on-the-go cleaning.
- Cotton Swabs: Useful for cleaning hard-to-reach areas.
Step-by-Step Guide to Cleaning Your Camera Lens
Step 1: Preparing Your Workspace
Ensure you have a clean, clutter-free workspace. Avoid cleaning your lens in a dusty environment to prevent new debris from settling on the lens during the cleaning process.
Step 2: Using the Blower
Start using the manual air blower to remove any loose dust or particles from the lens surface. Hold the blower a short distance away from the lens and use short bursts of air. Avoid blowing air directly from your mouth as it can introduce moisture onto the lens.
Step 3: Brushing Away Dust
After using the blower, take a soft-bristled brush and gently sweep away any remaining dust. Use light, circular motions and ensure the brush is clean and dry before use. This step is crucial as it helps remove particles that could scratch the lens if wiped directly with a cloth.
Step 4: Applying the Lens Cleaning Solution
If fingerprints or smudges exist on the lens, it’s time to use the lens cleaning solution. Apply a few drops of the solution to a microfiber cloth, not directly onto the lens. This prevents excess liquid from seeping into the edges of the lens where it could cause damage.
Step 5: Wiping the Lens
Using the microfiber cloth with the cleaning solution, gently wipe the lens in a circular motion starting from the center and moving outward. This method helps avoid streaks and ensures the entire surface is cleaned evenly. Use a fresh part of the cloth for each wipe to avoid reintroducing dirt onto the lens.
Step 6: Cleaning Hard-to-Reach Areas
For areas like the edges of the lens or around the lens mount, use a cotton swab lightly moistened with the lens cleaning solution. Be gentle and precise to avoid leaving any fibres or causing scratches.
Step 7: Using Lens Cleaning Tissue or Pre-moistened Wipes
For quick clean-ups or when you’re on the go, lens-cleaning tissues or pre-moistened wipes are convenient options. Ensure they are designed for camera lenses and use them similarly to the microfiber cloth, wiping in a circular motion from the centre outward.
Step 8: Final Check
After cleaning, inspect the lens under good lighting to ensure all smudges and dust particles have been removed. If necessary, repeat the cleaning process for any remaining spots.
Tips and Precautions for Cleaning Camera Lenses
Properly cleaning your camera lens is crucial for maintaining its performance and longevity. Follow these tips and precautions to ensure you clean your lens safely and effectively:
Tips for Effective Lens Cleaning:
1. Use the Right Tools:
- Always use tools specifically designed for camera lenses, such as a blower, soft-bristled brush, microfiber cloth, lens cleaning solution, and pre-moistened lens wipes.
2. Work in a Clean Environment:
- Clean your lens in a dust-free environment to prevent new particles from settling on the lens during the cleaning process.
3. Blow Away Loose Dust:
- Use a manual air blower to remove loose dust and particles from the lens surface before wiping. This prevents scratching the lens.
4. Wipe Gently:
- Use gentle, circular motions with a microfiber cloth or lens tissue, starting from the centre of the lens and moving outward. Avoid applying too much pressure.
5. Use Lens Cleaning Solution:
- Apply a few drops of lens cleaning solution to the microfiber cloth, not directly onto the lens. This prevents excess liquid from seeping into the lens edges.
6. Handle with Care:
- Hold the lens by its edges to avoid touching the glass surface. This reduces the risk of adding fingerprints and smudges.
7. Clean Both Sides:
- Don’t forget to clean the rear element of the lens as well as the front. Dust and smudges on the rear element can also affect image quality.
8. Check Your Work:
- After cleaning, inspect the lens under good lighting to ensure all smudges and dust particles have been removed.
Precautions to Avoid Damage:
1. Avoid Over-Cleaning: Excessive cleaning can wear down the lens coating and lead to scratches. Clean your lens only when necessary.
2. Don’t Use Household Cleaners: Household cleaning products can damage the lens coating. Always use a cleaner specifically designed for camera lenses.
3. Be Cautious with Compressed Air: Compressed air can be too powerful and may damage the lens or push debris into the camera body. Use a manual air blower instead.
4. Store Properly: Always use lens caps when the lens is not in use, and store your camera in a protective case to minimize exposure to dust and dirt.
5. Avoid Touching the Lens Surface: Your fingers contain oils that can leave smudges on the lens. Handle the lens by its edges and avoid direct contact with the glass.
6. Dry Before Storing: Ensure the lens and cleaning tools are dry before storing. Moisture can lead to mould or fungus growth on the lens elements.
7. Use Soft, Non-Abrasive Materials: Only use materials specifically designed for lens cleaning. Avoid using paper towels, facial tissues, or other abrasive materials that can scratch the lens.
8. Professional Help for Internal Issues: If you notice internal dust, mould, or other issues inside the lens, consult a professional. Attempting to disassemble and clean the lens yourself can cause further damage.
Special Considerations for Different Lens Types
Different types of camera lenses require specific care and handling to ensure they remain in optimal condition. Here are some special considerations for cleaning various lens types:
Zoom Lenses:
- Extending Barrel: Zoom lenses often have extending barrels that can attract more dust and dirt, especially when zooming in and out. Pay special attention to cleaning the barrel and the areas where it retracts.
- Moving Parts: Be cautious of the moving parts and avoid applying too much pressure during cleaning. Gently clean the outer elements without interfering with the zoom mechanism.
Prime Lenses:
- Fewer Moving Parts: Prime lenses typically have fewer moving parts than zoom lenses, making them easier to clean. Focus on cleaning the front and rear elements.
- Simpler Design: The simpler design of prime lenses means fewer crevices where dust can accumulate but still ensures thorough cleaning of the lens surface.
Macro Lenses:
- Close Proximity to Subjects: Macro lenses are used for close-up photography, which can result in more frequent contact with dust, pollen, or other particles. Regular cleaning is essential to maintain image clarity.
- Delicate Front Element: The front element of macro lenses is often more exposed and closer to the subject. Handle with extra care to avoid scratches or smudges.
Wide-Angle Lenses:
- Large Front Element: Wide-angle lenses have large front elements that are more prone to dust and fingerprints. Use a blower and brush to remove loose particles before wiping.
- Lens Hood: Utilizing a lens hood can help protect the front element from accidental touches and reduce the need for frequent cleaning.
Telephoto Lenses:
- Long Focal Length: Telephoto lenses are typically larger and heavier, making them more challenging to handle during cleaning. Ensure a stable workspace to avoid accidental drops.
- Extending Elements: Similar to zoom lenses, some telephoto lenses have extending elements that require careful cleaning around the moving parts to prevent dust buildup.
Vintage Lenses:
- Ageing Materials: Vintage lenses may have older, more delicate materials requiring gentler cleaning. Avoid harsh chemicals and use soft, non-abrasive cloths.
- Potential Fungus: Older lenses stored improperly may develop fungus. If you notice any signs of fungal growth, consider professional cleaning to prevent further damage.
Lens Filters:
- Attached Filters: If you use UV or polarizing filters, clean them regularly along with your lens. Filters can also accumulate dust and fingerprints, affecting image quality.
- Removable Filters: Remove the filter for thorough cleaning of both the filter and the lens beneath. Ensure both are dry and free of debris before reattaching.
General Tips for All Lenses:
- Use Lens Caps: Always use lens caps when the lens is not in use to protect it from dust and scratches.
- Handle with Care: Avoid touching the lens surface with your fingers. Hold the lens by its edges when cleaning.
- Store Properly: Keep your lenses in a clean, dry place, preferably in a protective case or bag to prevent dust accumulation and potential damage.
Advanced Cleaning Techniques:
For those dealing with more stubborn grime or internal dust, professional cleaning may be necessary. Here are some advanced techniques:
- Professional Cleaning Services: For internal dust or mould, it’s best to consult a professional.
- Disassembly: Only attempt if you are experienced and confident, as this can void warranties and cause damage.
- Ultrasonic Cleaners: Used by professionals, these devices can effectively clean hard-to-reach areas without disassembly.
conclusion
Maintaining a clean camera lens is essential for ensuring top-notch image quality and the longevity of your equipment. Regular, gentle cleaning with the right tools—like a blower, soft-bristled brush, microfiber cloth, and lens cleaning solution—helps prevent dust, smudges, and scratches. Avoid common mistakes such as using compressed air or over-cleaning, and always handle your lens with care. Proper storage and regular maintenance are also crucial in protecting your investment. For stubborn grime or internal issues, consider professional cleaning services. By following the steps and tips in this guide, you’ll keep your lens in pristine condition, resulting in sharper images and a longer-lasting lens. With the right approach, you’ll enhance your photography and ensure your equipment performs at its best for years to come.
FAQs
Q1: How often should I clean my camera lens?
- Clean your camera lens only when necessary, such as when you notice dust, smudges, or fingerprints. Over-cleaning can lead to wear and tear.
Q2: Can I use household cleaners on my camera lens?
- No, household cleaners can damage the lens coating. Always use a lens-specific cleaning solution.
Q3: What should I do if I notice internal dust or mould?
- Consult a professional for internal dust or mould. Attempting to clean it yourself can cause damage.
Q4: Is it safe to use compressed air on my lens?
- No, compressed air can be too powerful and may damage the lens or push debris into the camera body.
Q5: How can I prevent my lens from getting dirty?
- Use lens caps, store your camera in a protective bag, and avoid touching the lens surface. Regular maintenance and proper handling also help.